
You’ve finished your manuscript, now what? You’ve done all that hard work, all that revision, and now it’s time to publish your book. What comes next? Where do you go? Who do you call? I mean, beyond Ghostbusters?
The fewer questions you have, the easier it will be to transform your document into a real, live book. (Oh, sure, a book is an inanimate object, but why split hairs?)
I’m going to walk you through, step-by-step, the typical book production journey we guide our authors through at Summit Press Publishing. That way you can plan accordingly: you can take action. Without action, nothing happens. Fairies will not publish your book while you’re sleeping, regardless of what you may have been led to believe.
“Publishing is the final step in making a book; if I was afraid to publish one, I wouldn’t write it in the first place” —Charles Stross
But first….
A Brief Introduction
If you’re new to my world, I’m Ann Sheybani. I run a boutique publishing house called Summit Press Publishing, specializing in nonfiction books that inspire readers and catapult businesses. I started out–and we’re talking way too long ago to admit–running a local writers’ workshop with a couple of partners teaching craft. That morphed into book coaching, book doctoring, and ghostwriting. When, after all that hard work, only 25% of those folks published, I formed my own house. (I’m sorry, but there’s nothing worse than a terrific book smoldering in the bottom drawer.)
I work with, primarily, entrepreneurs, founders, and service professionals. They’re all about scaling their businesses, attracting better speaking opportunities, expanding their audiences, building their brands, and establishing authority in their field. They mean to impact lives and create empires with their books.
We’re all on the same page, in other words.
(P.S. I’m an American from CT, living in rural Ireland. My neighbors are dairy farmers and cows. I really like it like that.)
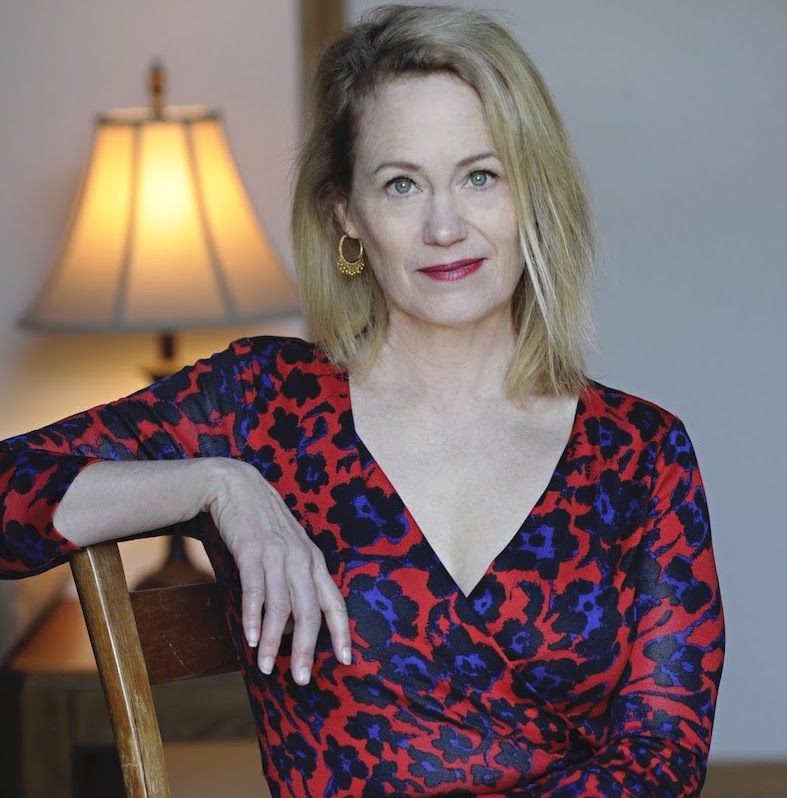
This is what I look like.
Even if you have different desires and expectations, you’ll need to know how the production process works if you’re to get your book out into the world.
The Main Types of Publishing
There’s one big choice that stands above the rest—and the entire process is ALL about making choices. What method of publication will you avail yourself of? (That ‘of’ at the end of the sentence is known as preposition stranding. It’s bad and I do it all the time. That’s why I have a team of professionals, who, by the way, have not taken a pass at this document.)
Because changes occur on a stunningly regular basis in the industry, I think it wise to give you a simplistic overview of the three main types of publishing available—traditional, hybrid, and self-publishing—and the differences between them. Knowing the major pluses and minuses of each makes choosing so much easier.
Traditional publishing
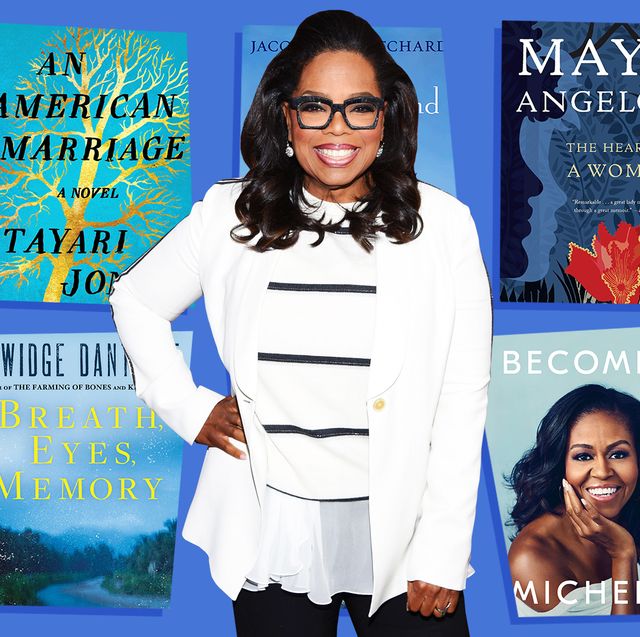
Most writers dream of the day a big publishing house buys their book and turns it into a bestseller. Gets them on Oprah, or Super Soul.
They can also picture the check—an ungodly sum with lots of pretty zeros in it—that will allow them to march into their boss’s office, slam their fist on the desk, say what’s been on their mind for years, and quit that soul-sucking day job.
Except, with rare exception, that’s not how this game works.
Not only are big advances as rare as hen’s teeth (cliché) for new authors, but there’s also one other important catch. Once a manuscript is accepted, once the publishing house negotiates the purchase of your intellectual property, better known as your book (and all the rights to it), and agrees on royalty rates, you pretty much step out of the decision-making matrix. Because the book is no longer yours; it belongs to the house to do with it what it will. And what the house may choose to do with it could curl your nose hair.
Once upon a time—before the success of wholesalers like Amazon and the advent of eBooks—traditional publishing houses were the only game in town. You wanted your book in print; you had to bang on their castle door. For many writers, however, particularly those who’ve spent years crafting a beautiful book, and/or those seeking the prestige and reach associated with a well-known house, traditional publishing may still be the preferred way to go. Traditional publishing houses, in theory, give authors exposure they wouldn’t be able to create on their own. Get in with them, and at minimum, they’ll submit your book to trade reviewers, make it available in their seasonal catalog, and make it more visible to buyers, like Barnes & Noble, who’ll then champion the book to customers. Providing they get customers through the door anymore, what with COVID, and the ability to buy books online for half the price. At best (if you’re ridiculously lucky, or famous), the biggest houses will send you, the author, on tour, get you big ad spaces in movie theaters (hahaha), have you featured in well-known magazines, and get you radio and TV spots. Nowadays, however, this sort of media blitz happens for Matthew Mcconaughey; not for people like you. (Unless you’re Charlize Theron. Then ignore this.)
If you want to go the traditional publishing route, you’ll likely need to hire an agent to represent you. And that’s just the start of the gauntlet. Which is while I’ll stop here unless you want to be reading all day.
If you do want to read all day, you can grab my book.
 How to Eat the Elephant: Build Your Book in Bite-Sized Steps
“Book publishing would be so much easier without the authors.” —Dan Brown
Hybrid Publishing
In between traditional publishing and self-publishing is hybrid publishing, also known as partnership publishing, which pairs industry experts with new authors and allows for both the author and the house to contribute the skills they’re truly best at. Summit Press Publishers is a hybrid press.
If you’re the sort who expects, no, demands to have a say in how your book looks, when it’s launched, how long it’ll stay on the market, how it’s promoted, then a hybrid press may be just the way to go. This arrangement can also be quite attractive to authors who don’t want to learn the necessary skillsets to produce a polished book, or track down the necessary experts for hire, as would be required with self-publishing.
Hybrid publishers are essentially general contractors. They work with a vetted pool of free agents—editors, interior and cover designers, illustrators, formatters, social media and public relations experts, e-book experts, and printing companies—on a job-to-job basis. Because they want to get hired for additional projects, the subcontractors working on your book will be, for the most part, conscientious professionals.
The downside of using a hybrid press is that, instead of receiving an advance from the publishing house for the rights to your book, you, the author, are required to pay a fee up front in most instances. This calculated fee is your share of the production costs. In return for taking on some of the house’s financial exposure, you, the author, get to take home a much larger cut of the profits for each book sold. This is what partnership is all about.
You’ll want to be wary of indiscriminate hybrid presses because they can compromise your book’s reputation. (Think indiscriminate home improvement contractors.) Judge for yourself by checking out their list of recent publications.
“In the end, what makes a book valuable is not the paper it’s printed on, but the thousands of hours of work by dozens of people who are dedicated to creating the best possible reading experience for you.”― John Green
Self-Publishing
Self-publishing, also known as indie (short for independent) publishing, is currently the most common way for new authors to bring their books to market. Because you don’t sell your rights, or enter into a partnership agreement, you, the author, make each decision, do all the work, and/or locate and hire professional help to assist with the myriad tasks.
Because this is the “easiest” method of publication, I should warn you: Without publishing house roadblocks to navigate, agents to win over, or hybrid press standards to be taken into account, the biggest mistakes an indie author can make is to rush the publication of his or her book, and to scrimp on expert costs. To publish an unpolished book only serves to soil your family name.
To quote Nancy Reagan, just say no.
If you’re going to self-publish your book, the one you’ve spent all that time and effort writing, be wise. Hire a designer and an editor or two to clean up your manuscript. Do what it takes to make it look professional before you toss it into the world.
“…if all people doing desktop publishing were doctors, we would all be dead!” –Massimo Vignelli
The Summit Press Production Process
For the purposes of this exercise, I’ll take you through Summit Press Publisher’s book production journey. If you have a traditional book deal already, bravo, you may still want to know what’s coming down the pike, what sorts of decisions will be made while you’re at home sipping coffee. If you plan on self-publishing, you’ll want to follow these steps as carefully as possible. You’ll be happy you did, despite the effort involved.
Step One: Gather or create this additional material:
You may think you’re done writing but guess what? There are a few more pieces you’ll need to come up with for your book. But only if you want it to look polished, professional, and complete.
Title and Subtitle
Well, you say, I’ve got a title already. This is a stupid statement, an irrelevant line item. Except, nine times out of ten, your “final” title (and subtitle) is probably not quite right. It may be too esoteric, or clever, or generic, or confusing. To market your book effectively, your title should speak to the book’s promise as well as the target reading audience.
If you’d like a few examples of excellent titles and subtitles, what makes them work, click HERE.
Table of Contents
The Table of Contents (TOC), located at the beginning of the book, just after the copyright page and the dedication, lists, primarily, chapters (and sections) and their starting page numbers. Sure, your page numbers will change by the time book production is complete, nonetheless, put something in place for the time being.
Acknowledgements
The Acknowledgements is, essentially, a list of the people and organizations that helped you, the author, during the book writing and publishing process: These nice folks are partially responsible for making the book as good as it could be. This list may include family members who carried additional burdens without too much griping, eagle-eyed editors, designers, beta readers, researchers, mentors, agents, and any friends who kept you moving forward when you wanted to up and quit. If you want to know an author, what kind of person he or she is, read their acknowledgements.
Dedication
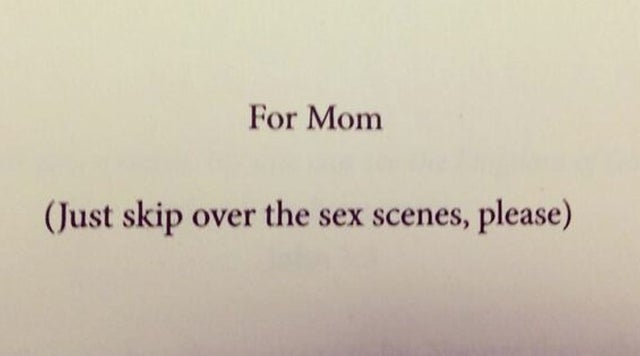
Who did you write this book for? The Dedication, which is usually a few lines on a separate page at the beginning of the book, tells the reader that. Dear old Mom. My children, who let me work during their soccer games. My best friend and mentor….that sort of thing. This is also a place where you can get creative. Case in point, check out these funny dedications.
About the Author
Tell us, your readers, about you. Yes, this is your place to shine, oh glorious author, but resist the urge to write your entire biography. Less is more. The description found in the About the Author section can be pulled in part from the About Me page of your website, or from an assortment of your relevant bios. This description of you, by the way, is written in third person. For examples to model, look at the About the Author page of other books, which is usually found at the end.
Disclaimer
A Disclaimer, which serves to limit your legal liability and that of your publisher, is a written statement that specifies your rights and the limits of your responsibility. What do I mean by legal liability? When you take your kids to the neighborhood playscape, for example, you’d likely see a sign that says, “Use at your own risk.” This is a disclaimer for the owner of the playground. If something happens while you’re there — if one of your kids falls off the slide and gets hurt, for example — the owner of the playground isn’t legally liable for it. If you take the owner to court, you’ll likely lose because you saw the sign, and you knew that you were using the playground at your own risk. If you don’t know how to compose a disclaimer, model the disclaimer found in other books on the copyright page.
Additional Resources (and/or bibliography) if it applies
Additional Resources, placed at the end of a book (which it is why it’s considered back matter), often includes suggested reading, including book titles and/or articles, as well as exercises or journaling prompts for the reader. Items of a kind are usually listed alphabetically.
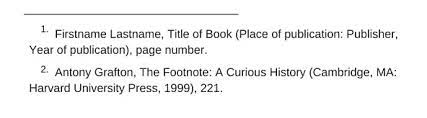
When referencing other published material in footnotes, you’ll want to create a separate Bibliography, which is housed in the back beside Additional Resources. You must cite the sources appropriately. You can learn how to format these by clicking here.
By the way, these are what properly formatted footnotes look like.
Appendices (if it applies)
Appendices, also an example of back matter, generally follow the Bibliography in placement. They can consist of figures, tables, maps, photographs, raw data, computer programs, musical examples, interview questions, sample questionnaires, and so on.
This is the type of information that, if embedded within the chapters of your book, would have made for a far too dense reading experience. You likely pulled have this material already, particularly if you were tempted to include it. Now you’ve got the perfect place to house that goodness.
Back cover copy (description of book for back cover) or Flap matter (if you are producing a hard cover book)
Back cover copy (and flap matter) is the distillation of what your book is about. This is the advertisement found on, well, you guessed it, the back cover. You’ll create at least two drafts to get this nailed down. This description needs to be succinct and capture the tone, topic, and theme of the book. Expert help is recommended. Or you can study this article.
Book blurbs
Book blurbs are the nice things important people in your field say about your book. These mini advertisements often appear on the front and back cover of your book, as well as on the first few (devoted) pages. Blurbs should recommend the book, not you, the author.
Blurbs take far more time to obtain than you’d imagine. Start the gathering process early. A publishing house will want these in hand before cover design. Look for a minimum of three, which can be placed on the cover of your book. More is better. The rest will go on their own page(s) inside the book.
Expect to write blurbs yourself when dealing with busy people. What do you want people to say about your book? Put that down in a Word document. Give the people you’re approaching a selection to choose from and allow them the opportunity to tweak any one they’ve selected.
Some people will want to read through your entire manuscript so they can give a blurb honestly, most will not want to take the time.
If you’d like an example of what to say to someone you want a blurb from, and some variations of blurbs, you can download it here.
Once we have all the material in hand, it’s time to send the complete package off to the editing department.
Step Two: Copy Editing
The job of the copy editor is to make sure your manuscript reads properly. To make sure that ideas flow logically from one page to the next, from one paragraph to the next, from one sentence to the next.
Once she (I’m using ‘she’ randomly) is satisfied with the material or all of her suggested changes in the sidebar, she then focuses on grammar and syntax. Is each sentence grammatically correct? i.e. does the introductory clause correlate with the subject of the sentence? Is the verb tense consistent? Is there subject verb agreement?
While she’s focused on the sentences, she’ll pick up on overused words. We all have tics; we all rely on certain words way too much. The glaring overuses need to be pointed out, however, and fixed. She’ll also pick up on overused sentence structure. Does every sentence begin with a character name? Dave did this; Dave did that; Dave, for the love of God! Are all the sentences the same length without any variation? Do you begin every sentence with a clause? The more grievous stuff should be pointed out so you can fix it before publishing.
If you’d like some tips about varying sentence structure, go HERE.
The copy editor is also responsible for punctuation, and for properly formatting the Bibliography, and alphabetizing the list of suggested reading. (Yes, it helps if you can do much of this formatting beforehand. And you can make life easy on everyone by using this tool, which will help you alphabetize your Bibliography.
She also focuses on capitalization, when to spell out the numbers, or leave them as digits, and spelling in general. (If you want to know when to spell out numbers, or leave them as digits, click HERE
Finally, she’ll eliminate the extra space after punctuation because most of us insert two spaces after a period or question mark because that’s how we learned to type, even though the industry standard is a single space.
Typically, she’ll make a first pass and include comments, explanations for what she did and why. These are known as queries, and they live in the sidebar of the edited document. Her changes will be highlighted (using a program like Track Changes to edit) so you can see what she’s done.
Then, you, the author, will read through the document, decide if you like the changes or not, catch anything that went unnoticed, or that got messed up somehow in translation, and return the document with your feedback.
This draft then goes back to the copy editor for another pass until she has the thing ironed out. The approved changes get incorporated–accept all changes in Track Changes, if you’re using that program—into the document.
Step 3: Proofreading
This is the stage that the proofreader first enters the picture. The proofreader looks for mistakes like typos or missing punctuation or weird spacing. Although primarily the copy editor’s domain, the proofreader may also pick up on spelling errors, incorrect word usage, or spots where the sentences read funny. She (again, random pronoun usage) can see these things because her eye is sharply focused on the small stuff. And she hasn’t read the draft multiple times, which tends to blind you.
- The first pass at proof reading should be done before it goes to the formatter.
- A second pass is done after the document goes to the formatter to make sure that no text has been dropped, or words accidentally eliminated in the process.
If you’d like to see our simple guide to the proofreading process, you can download it HERE.
I would fail miserably as a proofreader, by the way.
Step 4: Interior Design (aka Formatting)
The proofread document is then sent to the interior designer (or formatter), who puts the document into a template, incorporates the design elements requested, and makes it look like a real book.
Before he begins, (and I’ll use he for variety) he’ll need to know the desired trim size, which refers to the dimensions of a document after it’s been printed and cut down to its desired width and height. (KDP or any other printing company has a list of standard trim sizes from which to choose). Choice of trim size will depend on the printing company involved, their options, and associated prices.
The choice of recto vs. verso placement will be made next.
For recto placement, important elements such as the TOC, section and/or chapter pages, the About the Author section, etc. reside and/or begin on the right-hand side of the book. Blank pages may need to be inserted between elements to ensure a recto configuration.
For verso placement, many of these elements can reside and/or begin on either side of an open book. Chapter One may begin on a right-hand page, while Chapter Two may begin on a left-hand page. Few if any blank pages need be inserted.
Now, here’s where your vision really comes to bear. You like the way this book is laid out, or that one, even if you’re not consciously aware of the design choices that have been made. To better guide the designer, you’ll need to verbalize your preferences.
The following are the major design elements you’ll want to consider so you can communicate effectively:
Page numbers
Do you want the page numbers centered at the bottom of the page? Or would you prefer them at the top right-hand corner. Or at the bottom right corner…. Look at other books to help you decide.
Chapter headers
This is how the title of the chapter is presented. Chapter 1, say on the top line, with the name of the chapter below. Or Chapter 1: The Name of The Chapter on the same line. Or no reference to a chapter number, just the name of the chapter as a standalone. Again, look at other books to help you home in on your preference.

First letter or words of the chapter text
Some folks like the first letter of the first word in the first paragraph in each chapter to have a big CAPITAL letter. This is what is known as a drop cap. The size of an elemental drop cap is usually two or more lines, by the way. Others prefer a clean and simple look, with that first letter/word the same size as the rest of the text. Some like the first three words of the text to have some flourish—different sized font, or bolded, or italicized… Look at the other books on your shelf to help you decide what you want.
Chapter ending
You might think to yourself, Well, of course you end the chapter with the last word of the last paragraph. What more would anyone want? But sometimes you can add an icon to cap off the chapter. Or a couple of decorative lines. Just to give the chapter some personality. Preferences?
![]()
Placement of the takeaways/secrets/lessons
If you’ve written a good non-fiction book, each of your chapters will have a main lesson or point. Some authors choose to set these lessons apart, often at the end of the chapter, sometimes in the line where it is first delivered. Is this something that you’d want?
If you’ve written a business parable, you may have several lessons you want spelled out. The individual secret learned in a given chapter might be presented on its own page BEFORE the chapter, or at the END of the chapter.
The entire list of lessons/secrets can also be placed, en masse, at the back of the book– Secret #1-10 as a sort of summary, located before the About The Author and Acknowledgements section.
Other considerations
The designer may incorporate certain elements like boxed-off text, or indented quotes, or bulleted text, or inserted images or tables, that sort of thing. You’ll want to tell him precisely where you want these things. How ornate you’d like them to be, or how simple.
To see what lives behind interior design choices, the history of the art, because it’s an art, watch this.
Step 5: Cover Design
The job of the cover designer is to design the cover, which is not just the front, but also the back and spine. If you choose to produce a hardback book, he’ll also design the interior flaps, both front and back.
He will need to know several things before he begins this process:
- The trim size of the book
- The number of formatted pages (Even if you use 12-pt font, double-spaced, which is the industry standard for submitted manuscripts, the final page count of your book will differ after formatting. That’s why the finalization of the cover will be one of the last things that gets done.)
- The paperweight you’ll be using (50lb or 60lb being the most common)
- Hard cover or soft cover
(Most of the time, it’s a very easy adjustment to go from a paperback or hardcover version to a Kindle version. With a Kindle cover, there’s no need for a spine or back cover.)
The front cover, that beautiful image that calls to readers from the shelf, is what most authors can describe in detail, so long have they fantasized about this very moment.
They want the color of this book, and the font of that book, and an image like such and such… They want a blurb at the top, above the title, an another beneath their name. The clearer you are, the easier it will be for the designer to deliver.
And yet. Sometimes you may have a request for a cover concept that requires a few elements that are not in the normal toolbox of the designer. Which means they must be purchased at an additional cost to you.
These include:
- A specific font for the Title and subtitle.
- An ornate border
- Artwork or a cartoon-like image
The back cover and the spine are as important as the front cover, even if you’ve given them little thought.
Elements that live on the back cover
- The ISBN number and the associated bar code
An ISBN number is an International Standard Book Number consisting of 13 digits. The purpose of the ISBN is to establish and identify one title or edition of a title from one specific publisher and is unique to that edition, allowing for more efficient marketing of products by booksellers, libraries, universities, wholesalers, and distributors. A publishing house usually provides this, but an author may purchase one independently from Bowker.com.
The bar code associated with that ISBN will either be provided by the publishing house or auto generated by the printing platform. (Electronic versions, such as Kindle, do not need an ISBN number or a bar code.) This bar code can also be purchased by the author at Bowker.com. The retail price of the book, which is chosen by you, the author, will also appear on the barcode.

- Blurbs
You will want to consider adding blurbs to both the front cover and back cover. Again, you’ll want to have them ready at this stage of the process, which is why you gathered them before/during the editing process. If you’re still chasing blurbs down, you will infuriate your cover designer and publishing house.
- Author Picture
Having an author picture on the back cover or on the About the Author page is a matter of choice. If you go this route, you’ll want to provide an image with satisfactory resolution (300psi or better). Now, would you like a thumbnail, say, at the lower left corner, or would you prefer a larger picture above the book description? Look at other book covers to help you decide on placement and size.
- Book Description
This is the back copy for both the paperback and hardback version. How this summary is laid out may require adjusting because it needs to meld nicely with the other elements. Your description may need to be trimmed down at this point. (Again, there is an art to this.)
If you’d like to see how a master cover designer thinks, check out this video
Step 6: Uploading cover and formatted manuscript to the printers’ site
Now, I’m going to make this sound easy, so forgive me. If you’ve ever uploaded a formatted document to a printer, or even Amazon KDP, you know the process isn’t without roadblocks. Lots and lots of senseless roadblocks. That being said…
The formatter will create a specialized pdf version of the manuscript for upload; one that satisfies the printing house requirements.
In tandem, the book cover designer will also upload the cover—front and back, with or without flap matter. (For a soft cover produced on KDP, the back cover will have a hole where the ISBN Number and barcode will automatically go.)
At the same time, the formatter can also create an electronic version of the book (Kindle for KDP) for upload. The book cover designer can also upload an electronic version of the cover. (Note: there are several “shops” for electronic books. Each has its own quirks and specifications. Separate formatted manuscripts and covers need to be created for each. What works on KDP will not work on Smashwords.)
The printing house (most often KDP for soft cover books) will print and send a galley for physical review, so any adjustments can be made before official printing. A galley copy is an advance copy of your book. It’s not a completely finalized version, but it’s close enough to send to readers for promotional purposes. People sometimes refer to them as “uncorrected proofs.”
Step 7: Production and Shipment
When everything has been uploaded to the printing house, usually KDP, checked for satisfaction, signed off on, the book gets printed, and shipped to the author. (If you’re using KDP, this is the time you can hit the publish button and have your book listed for sale on the platform. This isn’t instantaneous, in fact, it can take up to 72 hours to see your lovely book waving at you from the shelf.)
If you’re using an outside printing company, a house that produces hard cover books, for instance, expect the uploading, checking process, physical print run, and shipping to take two and a half to three months. If you’re using KDP, you can have 100 books printed and shipped within a week or three.
Step 8: Celebrate
You’ve done it. You’ve produced a book. You’re now a published author. Go out and brag to everyone you know. Shout it from the rooftops. This is not the time to be humble.

If you found this helpful, make sure to forward it on.
If you’d like to receive more goodness, make sure to get my emails by going HERE.
To become Summit Press Publisher’s next author? Hit reply, and we’ll set up a call to explore the possibility.
